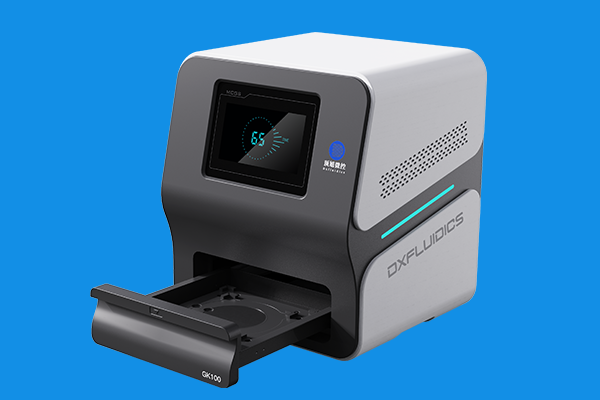
Desktop microlithography, designed for micron-level patterning, is designed to guarantee superior graphic transfer accuracy.
The equipment adopts UV LED cold light source, combined with double aspherical quartz lens, can generate parallel light with half angle <2°, compared with the traditional contact exposure machine, its ultra-compact volume will be shifted above the desktop, providing convenience and precision for operation.
The photolithography machine is widely used in the preparation of microfluidic chips, MEMS devices, optoelectronic devices and surface acoustic wave devices. Its performance is especially suitable for universities, research institutes and enterprises to carry out microfabrication process research.
Following the pace of modern technology, the introduction of Top Asahi's desktop microlithography has injected new vitality into micro and nanoprocessing, helping customers to move towards higher precision and innovation in the realization of their project goals.
1. Technical parameters

- Exposure Light Source: UV LED
- Wavelength of Light Source: 365nm
- Exposure Area: 4 inches, 6 inches optional
- Exposure Method: Single-side contact timed exposure
- Exposure Resolution: 2um
- Exposure Intensity: Adjustable from 20 to 200mW/cm22可调;
- Exposure Uniformity: ≤5%
- Light Source Parallelism: ≤2°
- Light Source Lifespan: ≥20,000 hours
- Power Supply Input: AC 220V ±10V, 50Hz
- Power Consumption: 250W
- Weight: 25kg
- Dimensions: 382 (Length) * 371 (Width) * 435 (Height)
- Operating Environment: Temperature 0℃-40℃, Relative Humidity <80%
2. Methods of use
This equipment is easy to operate and user-friendly. The specific operations are as follows:
I. Preparations Before Exposure
1)Silicon Wafer Preparation: Ensure that the silicon wafer to be exposed has undergone photoresist coating, with a clean and smooth surface, free from obvious stains or damage.
2)Selecting the Photomask: Depending on the project requirements, choose a photomask of the appropriate size. This equipment is compatible with 4-inch, 5-inch, or 6-inch photomasks.
3)Equipment Inspection: Carefully inspect the equipment to ensure all components are in normal working condition, and confirm that the operating environment is suitable.
II. Exposure Operation Steps
1)Install the Silicon Wafer: Place the silicon wafer to be exposed flat on the equipment chuck, ensuring accurate positioning.
2)Position the Photomask: Place the photomask flat above the silicon wafer. If using film masks, transparent glass should be positioned above to maintain stability.
3)Set Exposure Parameters: Use the control panel to set the exposure time and intensity, adjusting them based on specific requirements.

(Save Exposure Parameters: The parameter function allows the convenient saving of commonly used exposure parameters for easy retrieval during usage.)
4) Start Exposure: After confirming the parameter settings are correct, click the start button, and the equipment will initiate the exposure process.
5) Monitor Exposure Progress: During the exposure process, you can monitor the progress through the equipment interface to ensure everything is proceeding smoothly.
6) Exposure Completion: Once the exposure is complete, the equipment will provide a prompt. Remove the silicon wafer and the photomask.
Contact Information


Site Search
© 2025. All Rights Reserved. 苏ICP备2022036544号-1


